-->
Showing posts with label O365. Show all posts

Wednesday, October 16, 2024

Exchange - Regex Transport Rule To Block Recent Hotmail/Outlook.com Spam

I have a customer who's Exchange Online tenant is getting bombarded with spam from Hotmail and outlook.com free accounts. The spammers are creating "one-and-done" accounts with the following format:

firstname1234lastname5678@hotmail.com

firstname1234lastname5678@outlook.com

This particular tenant is receiving 1,000's of messages from these senders, so blocking them one-by-one or adding them to the tenant blocklist isn't feasible...neither is blocking the Hotmail/Outlook TLD because genuine senders could still be using those services.

So, I've come up with a regular expression to add to a Transport Rule (aka Mail Flow Rule) to block those by the text patterns.

Regex:

The patterns will look like so:

'^[a-zA-Z]+[0-9]+[a-zA-Z]+[0-9]+@outlook\.com$'

'^[a-zA-Z]+[0-9]+[a-zA-Z]+[0-9]+@hotmail\.com$'

Transport Rule:

We'll create a Transport Rule with the following settings:

Apply this rule if…

    The sender... is external

    The sender... address matches any of these text patterns:

        '^[a-zA-Z]+[0-9]+[a-zA-Z]+[0-9]+@outlook\.com$'

        '^[a-zA-Z]+[0-9]+[a-zA-Z]+[0-9]+@hotmail\.com$'

Do the following…

    Modify the message properties... set the SCL to 9 

**Note** Or you can just straight up block the messages, but I would do that after testing to ensure it’s catching these properly.

Now, you should see much less spam from Hotmail/Outlook.com until Microsoft can shut them down...they are starting to institute new throttling rules on new accounts, so hopefully that'll help.

Saturday, May 4, 2024

M365 - SuccessFactors/SAP 554 5.6.0 Invalid Message Content Error

In my environment, we run SuccessFactors (part of SAP) and as most Exchange admins can attest, SAP is absolutely terrible when it comes to relaying through Exchange/M365. One of the many problems we have (weekly, it seems) was our timecard notification jobs every Monday started erroring out after about the 5th message. The error (below) would cause any further messages in the job to stop.

It would throw a 554 5.6.0 invalid message content, stopping all further messages:

SuccessFactors Error

The way we have our relaying set, is for SuccessFactors (SF) to connect to our on-premises Exchange Hybrid servers. So, the most obvious place to start was message tracking on there. Sure enough, tracking showed the following:

{[{LRT=};{LED=554 5.6.211 Invalid MIME Content: Single text value size (32782) exceeded
allowed maximum (32768) for the 'Replicon_time_entries' header.
[MN2PR06MB6623.namprd06.prod.outlook.com 2024-04-29T14:43:26.364Z 08DC665FAD5D7B03]
[DS7PR05CA0090.namprd05.prod.outlook.com 2024-04-29T14:43:26.372Z 08DC6833DB2077BC]
[DS3PEPF000099D3.namprd04.prod.outlook.com 2024-04-29T14:43:26.374Z
08DC667B5B6206E2]};{FQDN=};{IP=}], [{LRT=};{LED=554 5.6.211 Invalid MIME Content: Single
text value size (32782) exceeded allowed maximum (32768) for the 'Replicon_time_entries'
header. [MN2PR06MB6623.namprd06.prod.outlook.com 2024-04-29T14:43:26.364Z 08DC665FAD5D7B03]
[DS7PR05CA0090.namprd05.prod.outlook.com 2024-04-29T14:43:26.372Z 08DC6833DB2077BC]
[DS3PEPF000099D3.namprd04.prod.outlook.com 2024-04-29T14:43:26.374Z
08DC667B5B6206E2]};{FQDN=};{IP=}]}

That means the header is too large for O365 to accept, so it bounces - it does not actually reach EXO, so tracing on that side won't show it.

If you look at the header of one of the working messages, SAP is adding a whole chunk of text, making the header way too big. Here's part of the header where you can see the extra junk:

Received: from BLAPR06MB6819.namprd06.prod.outlook.com (2603:10b6:208:29c::10)
 by SA1PR06MB7860.namprd06.prod.outlook.com with HTTPS; Mon, 29 Apr 2024
 14:43:30 +0000
Received: from CH2PR20CA0025.namprd20.prod.outlook.com (2603:10b6:610:58::35)
 by BLAPR06MB6819.namprd06.prod.outlook.com (2603:10b6:208:29c::10) with
Received: from vsa12723543.stl1.od.sap.biz (172.26.59.32) by
 EXHYB-01.exchangeitup.com (172.2.1.11) with Microsoft SMTP Server (TLS) id
 15.0.1497.2; Mon, 29 Apr 2024 09:38:24 -0500
Date: Mon, 29 Apr 2024 14:38:24 +0000
From: <sf_email@exchangeitup.com>
To: <raghi@exchangeitup.com>, <huang@exchangeitup.com>
Message-ID: <1453815201.500.1714401504559@webmail.exchangeitup.com
Subject: Replicon Clock Time Report for your Employees.
MIME-Version: 1.0
Content-Type: multipart/mixed;
boundary="----=_Part_499_2028040997.1714401503408"
breadcrumbId: ID-vsa12723543-1714116965992-360-6612
Replicon_time_entries:
 =?us-ascii?Q?Employee=5FId,User=5FFirst=5FName,User=5FLast=5FName,Punch?=
 =?us-ascii?Q?=5FDate,Actual=5FTime,Rounded=5FTime,Device=5FName20002644,M?=
 =?us-ascii?Q?ariah,Ak,04/22/2024,7:43:12,7:45:00,RepCC-4220002644,Mari?=
 =?us-ascii?Q?ah,Ak,04/22/2024,16:07:06,16:15:00,RepCC-4220008894,Kimbe?=
 =?us-ascii?Q?rly,Schex,04/22/2024,8:03:26,8:00:00,RepCC-4220008894,?=
 =?us-ascii?Q?Kimberly,Schex,04/22/2024,16:27:29,16:30:00,RepCC-4220?=
 =?us-ascii?Q?008894,Kimberly,Schex,04/23/2024,5:45:53,5:45:00,RepCC?=
 =?us-ascii?Q?-4220008894,Kimberly,Schex,04/23/2024,14:39:37,14:45:0?=
 =?us-ascii?Q?0,RepCC-4220008894,Kimberly,Schex,04/24/2024,5:51:44,5?=
 =?us-ascii?Q?:45:00,RepCC-4220008894,Kimberly,Schex,04/24/2024,14:3?=
 =?us-ascii?Q?1:30,14:30:00,RepCC-4220008894,Kimberly,Schex,04/25/20?=
 =?us-ascii?Q?24,5:49:15,5:45:00,RepCC-4220008894,Kimberly,Schex,04/?=
 =?us-ascii?Q?25/2024,15:50:32,15:45:00,RepCC-4220008894,Kimberly,Schex?=
 =?us-ascii?Q?der,04/26/2024,7:18:20,7:15:00,RepCC-4220008894,Kimberly,Sch?=
 =?us-ascii?Q?ex,04/26/2024,15:02:55,15:00:00,RepCC-4220009046,David?=
 =?us-ascii?Q?,Le,04/22/2024,8:52:00,9:00:00,RepCC-4220009046,David,L?=
 =?us-ascii?Q?e,04/22/2024,17:19:04,17:15:00,RepCC-4220009046,Davi=09?=
 =?us-ascii?Q?d,Le,04/23/2024,14:42:26,14:45:00,RepCC-4220009046,Davi?=
 =?us-ascii?Q?d,Le,04/23/2024,17:33:48,17:30:00,RepCC-4220009046,Davi?=
 =?us-ascii?Q?d,Le,04/24/2024,7:09:38,7:15:00,RepCC-4220009046,David,?=
 =?us-ascii?Q?Le,04/24/2024,11:33:42,11:30:00,RepCC-4220009046,David,?=
 =?us-ascii?Q?Le,04/24/2024,12:39:00,12:45:00,RepCC-4220009046,David,?=
 =?us-ascii?Q?Le,04/24/2024,17:07:04,17:15:00,RepCC-4220009046,David,?=
 =?us-ascii?Q?Le,04/25/2024,8:23:55,8:30:00,RepCC-4220009046,David,Le?=
 =?us-ascii?Q?,04/25/2024,12:38:36,12:45:00,RepCC-4220009046,David,Le?=
 =?us-ascii?Q?,04/25/2024,13:24:12,13:30:00,RepCC-4220009046,David,Le?=
 =?us-ascii?Q?,04/25/2024,18:24:30,18:30:00,RepCC-4220009046,David,Le?=
 =?us-ascii?Q?,04/26/2024,8:56:30,9:00:00,RepCC-4220009046,David,Leon?=
 =?us-ascii?Q?,04/26/2024,13:09:16,13:15:00,RepCC-4220009046,David,Leon?=
 =?us-ascii?Q?,04/26/2024,17:19:09,17:15:00,RepCC-42?=
SAP_MessageProcessingLogID: AGYvsBZt3pwAL7njbCl8KGJK3Otz
SAP_MplCorrelationId: AGYvsBZ7JcYHEU4lhPxb5wfRsIrh
SAP_PregeneratedMplId: AGYvsN9elo-RaXm3THlA0l_jfzPn
SapGroup: 1
SapSplitExpression: //RepliconPunches
Return-Path: sf_email@exchangeitup.com

See all that extra text? That made the header way past the 32KB size limit. So, we need to get our SAP guys to check their flow on the SAP server-side to stop it from editing the header.
Once you get that fixed it'll be just like any other mail header and send successfully!

Saturday, April 13, 2024

Exchange/M365 - Who Moved Or Deleted A Folder In A Shared Mailbox?

I recently had an all-too-common request: "who deleted a folder from a Shared Mailbox?".

Technically you can audit these actions in M365 Purview/Exchange Admin Audit log, but it's cumbersome and takes forever...you know when you start a compliance search and hit refresh dozen times and it sits there in a "starting" state?

This is the method I've used for years before MS added the "audit 'move' for delegates" setting to mailboxes and it's still my go-to method over auditing. The reason being that auditing Shared Mailboxes can be hit or miss, and you can't easily tell where an entire folder was moved to; works fine for single items.

A faster, cleaner, way is to get the list of users who have Full Access into a CSV and pipe that in the Exchange Management Shell (EMS) to find the "missing" folder. 

The default way shared mailboxes function is: whoever deleted a folder/item, it goes into their Deleted Items folder, not the Shared Mailbox Deleted Items...unless you've done a registry hack to change it (which is only feasible if you have a handful of users).

In my environment, we use Security Groups to assign Full Access, so I'll show you how to grab that user list, but the method remains the same if you assign users one-by-one as well.

Create a CSV with "Identity" as the header and the email addresses below:


CSV Users


You can export the group members by running:

$DL = "DL"

Get-DistributionGroupMember -Identity $DL | Select primarysmtpaddress | Export-CSV "members.csv" -NoTypeInformation

**Note** Change "DL" to the distro you're working with.

Once you have your CSV exported, change the header to "Identity" like above.

Then, run:

import-csv filename.csv | foreach {Get-MailboxFolderStatistics -Identity $_.Identity | Where {$_.Name -eq "Margaret"} | Format-Table Identity,ItemsInFolderAndSubfolders,FolderAndSubfolderSize -AutoSize}

**Note** Change filename.csv to your CSV and "Margaret" to the name of the folder you're looking for.

It will spit out who has that folder in their mailbox:

EMS Missing Folder


Notice how it shows the folder under User\Inbox\Foldername path? The problem user inadvertently moved the folder into her Inbox. If they deleted it, it would show User\Deleted Items\Foldername

Caveat: If the user deleted the folder and emptied their Deleted Items folder, you're out of luck recovering the entire folder. You have do to some more PowerShell magic to recover those and that's beyond the scope of this article.

Now, you can contact that user and yell at them to MOVE THE FOLDER BACK!

Saturday, March 23, 2024

M365/Proofpoint - Bypass Link Checking For MassMailers Like Mailchimp

One of our users sends monthly newsletter blasts to a couple thousand recipients through MailChimp. The problem is (and I've seen this issue floating around on various forums like reddit) spam filters that do URL checking skew the open and link-click rates in the MailChimp dashboard. So, when the user goes to check the reports it shows 100% clicks, which is not anywhere near accurate considering over 2,000 people received the email blast.

What's happening, is the URL defense service (in our case Proofpoint Targeted Attack Prevention and M365 Security SafeLinks) is simulating a "click" in order to scan the URLs in messages to check for any malware.

In my environment MailChimp is spoofing one of our email addresses. So setting a bypass for the actual MailChimp sender or IP or even sending host wouldn't work because bulk senders use several IPs/hosts and they use those ugly-looking bounce email addresses to send...you know those ones that are like bounce-1234567899876543221@your_own_domain_even_though_its_not_you_sending_it.com

Here's how I created a bypass on both Proofpoint and M365/Exchange Online. 

You might be asking why do we run both Proofpoint and EOP (Exchange Online Protection)? The answer is: we're stupid and gluttons for punishment...it's much more fun to chase down issues when mail takes way too many hops.

Having said that, Proofpoint support pointed fingers at MS and vice-versa...so I had to bypass both to be sure.

Proofpoint:

**Note** This the "real" full-blown Proofpoint, not Essentials.

Policy Route:

Under System > Policy Routes:

Create a policy route called something like DisableTAP

Add the sender email address (in our case the spoofed address). 

Since we're adding a spoofed address, it won't match the actual sender (i.e. envelope sender) so I had to use the "message header 'from' (address only) equals sender@exchangeitup.com" entry.

Save your changes

URL Defense:

Under Email Protection > Targeted Attack Prevention > URL Defense > Settings:

Check the box marked "Disable processing for selected policy routes..."

In the "available" list scroll till you find the DisableTAP rule you created earlier and click the >> button to add it to the "disable for any of" list.

Save your changes

TAP Dashboard:

Go to the Targeted Attack Prevention > Dashboard.

In the dashboard, click the settings gear in the left pane, then the Organization tab.

Scroll down to "Excluded Addresses".

Click "ADD EMAIL ADDRESS", input the address you used for the above Policy Route, and the drop-down to "Sender".

After all this is done, give it 15-30 minutes (sometimes Proofpoint is slow for settings take effect).

Exchange Online:

Under Mail flow > Rules:

Create a new rule called something like "Spammysender bypass SafeLinks"

Apply this if:

The Sender > address includes any of these words

input the sending address we used in the Proofpoint route

Do the following

modify the message properties > set a message header

input X-MS-Exchange-Organization-SkipSafeLinksProcessing with a value of 1

Give it a couple hours to take effect and test the inbound mail from the MailChimp sender. It should now show more accurate open and click rates.

Friday, March 15, 2024

M365 Planning Diagram: Mail Encryption Flow

If you follow my blog, you know that I like to use Visio to draw pretty pictures to use when planning out Messaging Environments, like this one here.

We're currently migrating our mail encryption from Proofpoint to M365 Purview. Like most organizations, we have steering committees filled with business leaders/stakeholders who need stuff in plain language and diagrams always help.

So, I created this encryption "flow" diagram to show what happens when one of our users encrypts an outbound message to when the recipient opens it - start to finish. This way the higher-ups can visualize how exactly mail encryption works.

M365 Mail Encryption Flow Overview

In my example below we have a user sending a message using the [secure] subjectline tag or encrypt button, which is an option that can be set in OME (Purview Message Encryption), or attaches some sensitive data containing PII/PHI (Personally Identifiable Information/Protected Health Information).

The message then flows through Purview where it detects the tag or encrypt button usage or sensitive data using DLP filters, then to the Encryption Portal where it's stored for the recipient.

A notification is sent to the recipient saying they have an encrypted message waiting.

The recipient clicks the link, which takes them to the Purview Portal to view the message.

A notification is sent to the sender that the recipient opened the message.

If the recipient replies, the message is sent back through Purview Encryption then on to the original sender.


M365 Encryption Flow


Feel free to grab the Visio file from my Google Drive Mail Encryption Flow.vsdx to use for your environment!

Monday, March 11, 2024

Exchange - Assign Calendar Permissions In Bulk

In my current environment, we have a mix of Shared Mailbox Calendars and calendars shared out by users themselves. While I prefer to use Shared Mailboxes, some departments have high turnover depending on if they contain students and interns so managing calendar perms would be a never ending task for admins.

In this instance, a calendar managed by a user got corrupted (happens a lot on M365 for some reason) and we had to create a new calendar. The problem was, this particular calendar had over 70 users with varying permissions (editor and reviewer). So I needed a way to quickly assign those same perms to the new calendar, without the user having to do it by hand.

You may be asking, why not assign perms by group? Since this is a user-managed calendar, they have no access to AD/groups and with the turnover I mentioned, they add/remove users almost weekly so after the initial assignment, it will be done per user anyway.

As always, PowerShell to the rescue!

First, we'll build a CSV with "Name" as the heading and the list of users like so:

CSV

Or if you're copying perms from another calendar, you can export the names and access rights.

In the Exchange Management Shell (EMS) run the following:

Get-MailboxFolderPermission "Buddy Guy:\Calendar\Dept Calendar" | where {$_.accessrights -eq 'editor'} |select user,accessrights | Export-Csv C:\Scripts\caleditors.csv -NoTypeInformation

The above cmdlet will grab all users who have editor rights on the calendar.

Get-MailboxFolderPermission "Buddy Guy:\Calendar\Dept Calendar" | where {$_.accessrights -eq 'reviewer'} |select user,accessrights | Export-Csv C:\Scripts\calreviewers.csv -NoTypeInformation

The above cmdlet will grab all users who have reviewer rights on the calendar.

**Note** Change "Buddy Guy:\Calendar\Dept Calendar" to the user and calendar you're working with and the path and filename you prefer.

Then, format those CSVs like the example above, with just the names.

Next, run the following:

Import-Csv C:\Scripts\caleditors.csv | foreach {add-MailboxFolderPermission -Identity "Buddy Guy:\Calendar\NEW Dept Calendar" -User $_.name -AccessRights Editor}

This will assign editors on the new calendar.

Import-Csv C:\Scripts\calreviewers.csv | foreach {add-MailboxFolderPermission -Identity "Buddy Guy:\Calendar\NEW Dept Calendar" -User $_.name -AccessRights Reviewer}

This will assign reviewers on the new calendar.

**Note** Change "Buddy Guy:\Calendar\NEW Dept Calendar" to the user and new calendar you're working with and path and filename to the where you saved your CSVs.

Now, if you check permissions on the new calendar, you'll see that all of those editors and reviewers have been set. You can run Get-MailboxFolderPermission "Buddy Guy:\Calendar\NEW Dept Calendar" to grab all those perms.

A couple notes to finish up:

Users will still need to manually add the new Calendar to their Outlook.

If running on M365, it *may* take a while for the perms to take effect - I usually tell users to give it a day just to manage expectations - though it will usually work within a few minutes in OWA.

PS. I'll work on a script to copy and apply perms in one shot when I get a chance.

Sunday, January 21, 2024

Teams - Get Team URL, Display Name and Owner

In my current environment, we do a lot of Litigation Holds...it's a medical org, so I mean A LOT of holds.

Not only do we have to do mailbox holds, but we have to place SharePoint, OneDrive and Teams on hold. SP and OneDrive are pretty easy as those URLs can be found in the Admin Center; not so for Teams URLs. We also need to find the owners of those Teams so they can be placed on hold as well.

I came up with a one-liner that will spit out all those URLs along with owners to make it easier to copy/paste them into the Hold in the eDiscovery Admin Center.

First, we'll need to make sure the results aren't truncated because some Teams can have several owners, and it will just show the "userna..." instead of the full name.

In M365 PowerShell, run:

$FormatEnumerationLimit=-1

Then, run:

Get-Team -User user@domain.com | foreach {Get-UnifiedGroup -Identity $_.groupid} |fl SharePointSiteUrl,managedby

**Note** user@domain.com is the account we're putting on hold and needing to find if they own any Teams. 

The output will look like this:

Teams URLs

Once you have those links, you can paste them into your eDiscovery SharePoint/OneDrive/Teams holds instead of typing everything manually.

Happy holding!

Sunday, October 1, 2023

M365 - Get-EXOMailbox : Error while querying REST service. HttpStatusCode=500

I previously wrote a post on how to create an M365 Remote PowerShell shortcut and would get errors when running EXOMailbox cmdlets. All other cmdlets worked fine, including Get-Mailbox, and connecting "manually" to Exchange Online worked fine. 

Btw, the reason you wanna use Get-EXOMailbox is it's a lot faster than Get-Mailbox...like, way faster.

The error I got was:

Get-EXOMailbox : Error while querying REST service. HttpStatusCode=500 ErrorMessage={"error":{"code":"InternalServerError","message":"The call to Microsoft Exchange Active Directory Topology service on server 'TopologyClientTcpEndpoint (localhost)' returned an error. Error details Active Directory server  is not available. Error message: Active directoryresponse: The LDAP server is unavailable..","innererror":{"message":"The call to Microsoft Exchange Active Directory Topology service on server 'TopologyClientTcpEndpoint (localhost)' returned an error. Error details Active Directory server  is not available. Error message: Active directory response: The LDAP server is unavailable..","type":"Microsoft.Exchange.Data.Directory.ADTransientException"}}}}

Apparently, this is a problem with the Exchange Online module 3 and above - I'm currently running 3.3.0. You'd think after 4 build updates MS would fix it but guess not.

The workaround is to connect to the Security & Compliance module before connecting to Exchange Online.

For instance, my PS Shortcut script would look like so:

$acctName="admin@domain.com"
$orgName="domain.com"
#Azure Active Directory
Connect-MsolService
#SharePoint Online
Connect-SPOService -Url https://exchangeitup-admin.sharepoint.com
#Security & Compliance Center
Import-Module ExchangeOnlineManagement
Connect-IPPSSession -UserPrincipalName $acctName
#Exchange Online
Connect-ExchangeOnline -UserPrincipalName $acctName -ShowProgress $true
#Teams and Skype for Business Online
Import-Module MicrosoftTeams
Connect-MicrosoftTeams

Now, when you try to run the EXOMailbox cmdlets, it'll fire off correctly!

Tuesday, September 12, 2023

M365 - Create Remote PowerShell Shortcut (updated)

In a previous post, I showed how to create a Remote PowerShell shortcut for Office 365 using Remote PowerShell (RPS), to save you from having to type in the remote session every time you connect.

Since Microsoft has deprecated RPS in favor of REST API, I've created a new script that will import the needed sessions and connect to the following M365 services in one shot:

Azure AD
SharePoint Online
Exchange Online
Security & Compliance Center
Teams

First, you'll need the latest EXO (Exchange Online) module - 3.3.0 at the time of this writing - in order to connect to Security & Compliance, which you can get here.

Next, set your PowerShell execution policy - I use Unrestricted but you can use RemoteSigned:

Set-ExecutionPolicy Unrestricted

Now, we'll grab the other required modules:

MSOL

PowerShell Gallery | MSOnline 1.1.183.66

SharePoint

PowerShell Gallery | Microsoft.Online.SharePoint.PowerShell 16.0.24009.12000

Teams

Install .NET 4.7.2 or higher

Run the two following cmdlets:

Install-Module -Name PowerShellGet -Force -AllowClobber

Install-Module -Name MicrosoftTeams -Force -AllowClobber

**Note** We're using MSOL because it's more comprehensive than AzureAD

**Note** Security & Compliance uses the EXO module, so nothing is needed for that.

Next, copy the following block and paste it into Notepad:

$acctName="admin@domain.com"
$orgName="domain.com"
#Azure Active Directory
Connect-MsolService
#SharePoint Online
Connect-SPOService -Url https://exchangeitup-admin.sharepoint.com
#Security & Compliance Center
Import-Module ExchangeOnlineManagement
Connect-IPPSSession -UserPrincipalName $acctName
#Exchange Online
Connect-ExchangeOnline -UserPrincipalName $acctName -ShowProgress $true
#Teams and Skype for Business Online
Import-Module MicrosoftTeams
Connect-MicrosoftTeams

**Note** Change $acctName="admin@domain.com" and $orgName="domain.com" to your admin account and domain name.

Save it as a .ps1 with a name like Connect-365.ps1 to somewhere like C:\Scripts

Next, create a PowerShell shortcut anywhere, like on your Desktop:

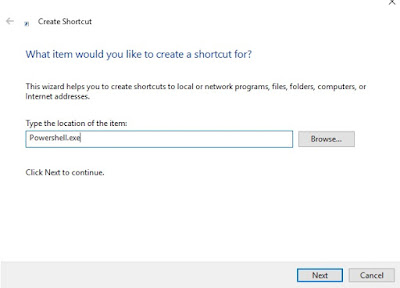
Right-click the Desktop > New > Shortcut

New Shortcut

In the location field, enter:

Powershell.exe

Powershell.exe Shortcut

Click Next

Give it a name like O365RemotePS and click Finish.

O365 Remote


Right-click
 the new O365RemotePS shortcut, and go to Properties.


In the Target field, add the following to the end of the line:

-NoExit -File "C:\Scripts\Connect-365.ps1"

It will look like so:

C:\Windows\System32\WindowsPowerShell\v1.0\powershell.exe -NoExit -File "C:\Scripts\Connect-365.ps1"

Click OK.

Run your new shortcut as your admin user, and you'll get a windows creds prompt and then the account picker for your Microsoft 365 organization.

**Note** You will get an account picker for each service depending on your security config in M365. 

**Note** Enter creds in the username@orgname.com format.

Once it starts the remote session, you'll be able to run your M365 cmdlets.

Saturday, May 4, 2019

Outlook - Teams Add-in Overrides Skype Meeting Add-In

My company uses Teams for meetings internally, but many of our clients use SFB on-premises, so we need to be able to schedule meetings in both modalities depending on the attendees.

The problem is: once Teams is installed, the Teams Outlook add-in takes precedence over the SFB add-in - the SFB add-in actually gets disabled.

If you enable the add-in from within Outlook > Options > Add-ins > COM Add-ins, it will revert back to "unloaded" when you next log on...maybe this Microsoft's way of forcing everyone to Teams, I dunno, but they need to fix it!

Here's what I'm talking about: in Outlook, only the Teams add-in will be shown when setting a new meeting: 

Outlook Teams Only


To fix this, you need to hack the registry to force Outlook to show both Teams and SFB.

To manually set it, navigate to:

HKEY_CURRENT_USER\Software\Microsoft\Office\Outlook\Addins\UCAddin.LyncAddin.1

The LoadBehavior key will most likely be set to "0" which is Off.

LyncAddin LoadBehavior Off
 

We need to set the LoadBehavior key value to "3" which is Load At Start:

LyncAddin LoadBehavior On
 
If you don't have the key present (sometimes it won't be there), or don't want the hassle of setting it, you can grab the reg file from my Google Drive. Installing this will create the key if it's missing, or set it to "Load At Start" if it's in there already.
 
You can also use PowerShell to set the key, by running the following cmdlet in an Elevated PS session:
 
Set-ItemProperty -Path "HKCU:\Software\Microsoft\Office\Outlook\Addins\UCAddin.LyncAddin.1" -Name loadbehavior -Value 3
 
There's no need to restart the machine with either the reg change or the Shell method, the changes will automatically take effect.
 
Now, when creating a new meeting, both add-ins will be shown:
 
Outlook SFB And Teams

You can push out the reg file in a GPO if you have a lot of machines that are affected - in my case it was only a few of us.

Saturday, March 23, 2019

Office 365 - Create Remote PowerShell Shortcut

In a previous post, I showed how to create a Remote PowerShell shortcut for Exchange on-premises, to save you from having to type in the remote session every time you connect.

Since I've been doing more work in O365, I decided to do the same for that; especially because Office 365 has many more connections you have to run, such as Exchange, Skype For Business/Teams, Azure AD, and Security Center.

This PS shortcut will install and import those sessions and get you signed in all in one shot.

First, set your PowerShell execution policy - I use Unrestricted but you can use RemoteSigned:

Open PowerShell as admin, and run:

Set-ExecutionPolicy Unrestricted

Next, enable PS remoting by running:

Enable-PSRemoting

Then, install the required modules:

For MSOL, run:

Install-Module MSOnline

**Note** We're using MSOL because it's more comprehensive than AzureAD

**Note** Running the above cmdlet should install the latest version straight from the PowerShell gallery. If it doesn't, browse here and grab it:

https://www.powershellgallery.com/packages/MSOnline/1.1.183.17


Next, download the Skype for Business Online Connector module from here:

https://www.microsoft.com/en-us/download/details.aspx?id=39366

**Note** As of this writing, the SFB Online Connector will manage Teams as well.

Next, copy the following block and paste it into Notepad:

$credential = Get-Credential
$exchangeSession = New-PSSession -ConfigurationName Microsoft.Exchange -ConnectionUri
https://outlook.office365.com/powershell-liveid/ -Credential $credential -Authentication "Basic" -AllowRedirection
Import-PSSession $exchangeSession -DisableNameChecking
$SccSession = New-PSSession -ConfigurationName Microsoft.Exchange -ConnectionUri
https://ps.compliance.protection.outlook.com/powershell-liveid/ -Credential $credential -Authentication "Basic" -AllowRedirection
Import-PSSession $SccSession -Prefix cc
Connect-MsolService -Credential $credential
Import-Module SkypeOnlineConnector
$sfboSession = New-CsOnlineSession -Credential $credential
Import-PSSession $sfboSession


**Note** I left out the SharePoint Online connection, because in order to run it without errors you either need to set your local DNS to Google's, or use the web login and that's a pain - plus I don't manage SharePoint, so......

**Note** The Exchange Online and Security Center won't work if you run MFA. For that, you need to install the EXOPS modules, which can't be run in a single window.

Save it as a .ps1 with a name like O365-Remote.ps1 to somewhere like C:\Scripts

Next, create a PowerShell shortcut anywhere, like on your Desktop:

Right-click the Desktop > New > Shortcut

New Shortcut

In the location field, enter:

Powershell.exe

PowerShell Shortcut


Click Next

Give it a name like O365RemotePS and click Finish.

O365 Remote Shortcut


Right-click the new O365RemotePS shortcut, and go to Properties.

In the Target field, add the following to the end of the line:

-NoExit -File "C:\Scripts\O365-Remote.ps1"

It will look like so:

C:\Windows\System32\WindowsPowerShell\v1.0\powershell.exe -NoExit -File "C:\Scripts\365-Remote.ps1"

Click OK.

Run your new shortcut as admin, and you'll get a creds prompt for your Office 365 organization.

**Note** Enter creds in the username@orgname.com format.

Once it starts the remote session, you'll be able to run your O365 cmdlets.

Remote MSOL

Remote CSUser
 
Remote Mailbox
 

Sunday, December 2, 2018

Exchange 2016 Planning Diagram: Hybrid

If you follow my blog, you know that I like to use Visio to draw pretty pictures to use when planning out Messaging Environments. Examples can be found here, here and here. The diagrams really come in handy when presenting a build to a new client, or to your higher-ups so they can see what the finished setup will look like.

I just happen to be planning out an Exchange 2016 Hybrid scenario, which will use the current on-premises Exchange environment and expand it out to Office 365. What a great chance to create a new diagram!

Feel free to grab the Visio diagram further down in the post and edit it to match your environment, in order to save time in creating one yourself.

Exchange 2016 Hybrid Planning Overview

In my example below, we're starting with a 3-node Exchange 2016 DAG with the accepted domain of "domain.com" and "mail.domain.com" as the namespace.

We have a two-arm Load Balancer (one NIC or "arm" in the DMZ, and one in the Internal LAN) which will server up mail.domain.com for our users that have mailboxes homed on-prem.

An on-premises Skype For Business Front End (SFB1.domain.com), with Unified Messaging going to the on-prem Exchange servers.

We're going to expand the on-prem Exchange out into Office 365, creating a Hybrid Environment.

This will require adding:

An Azure AD Connect Server for DirSync (AAD.domain.com)

An ADFS Server for authentication (ADFS.domain.com)

And installing the Hybrid Server on Exchange (hybrid.domain.com)

**Note** You'll want to edit the generic names of the domain to match your environment.

As you can see in the diagram, all the new servers are added, with the connection flow to/from Exchange and O365.


Exchange 2016 Hybrid Overview


To edit the diagram to fit your organization, you'll need to download the Exchange/Office 365 Visio stencils from Microsoft, so the shapes will render correctly.

Once you have those downloaded, move them to C:\Users\Your_User\Documents\My Shapes

Then, hop over to my Google Drive and grab the Exchange Hybrid Overview.vsdx

Happy diagramming :)