The growing trend nowadays, especially when sending messages to banks, is to use Forced TLS (also called Mandatory TLS). On top of TLS, most banks are now also requiring that the sending host use a public certificate to verify "you are who you say you are" - this is generally done with SPF records, but security requirements are getting more stringent.
If you're sending directly from Exchange and not using a spam filter (which probably isn't very common these days) you would just set up a Partner Send Connector and be done - except for assigning a cert to the connector, which is pretty tricky.
Since most organizations do use some sort of outgoing appliance (like SpamTitan), this post will walk you through setting up Forced TLS from Exchange on out through that gateway.
In my environment, we receive messages through a SpamTitan filter (which is awesome), but we send out through a Totemo encryption gateway...ever heard of it? Didn't think so. My short review on that product: It's garbage.
I was forced by company higher-ups to use it, going against my recommendations because it's not good practice to send and receive through different hosts/IPs - Totemo doesn't receive mail and it doesn't work very well...it runs on Java, which should tell you all you need to know. But it uses the "encrypt" button in Outlook to make users feel better, which adds complexity and results in help tickets...daily.
So, I decided to use the SpamTitan for outgoing TLS connections and it works perfectly!
Exchange Send Connector
We'll need to create a special Send Connector on Exchange to use the SpamTitan as a Smart Host.
**Note** Even if you're already using something like SpamTitan as your smart host on your current Send Connectors, I find it cleaner to create a dedicated connector for TLS - this way you can manage the domains requiring TLS without affecting your regular mailflow.
In the EAC (Exchange Admin Center) navigate to Mail Flow > Send Connectors. Click the "+" to create a new one:
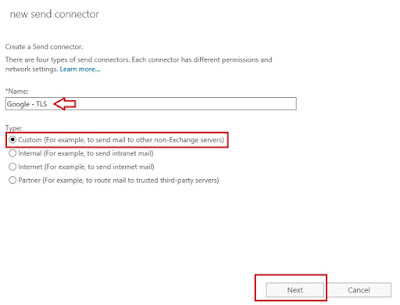
Give the Send Connector a name like "Google - TLS" and choose "Custom":
**Note** We don't need a partner connector in this case, because mail will flow through our smart host not directly to our recipients.
Choose "Route mail through smart hosts", click the "+" and add your SpamTitan public IP address. Then click Next:
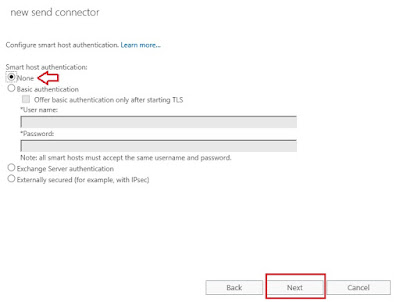
There will be no authentication, so leave "None" selected and click Next:
In the Address space, click the "+" and enter the domains that you will sending over TLS to. If you want to include subdomains (which you always should), put an asterisk in front of the domain name. For instance to send to all of google/gmail, you'll enter *.google.com. Click Next when you've entered the domains:
In the Source server, click the "+" and choose your Edge Server(s) if you have them, otherwise choose your internet-facing Mailbox Server(s) and click Finish:
Your Send Connector is now created. Double-click it and change logging to "Verbose" and click Save. This will allow us to diagnose any issues later on by checking protocol logs, should TLS not work correctly:
SpamTitan SSL Settings
On the SpamTitan WebUI, we need generate a CSR (Certificate Signing Request) so we can assign a public cert to send and receive with.
On your SpamTitan appliance, navigate to Settings > SSL. In the "Generate CSR" section, fill out the company info according to values below:
Common Name: The FQDN of your SpamTitan host
Organization: Your company name
OU: Optional
City/State/Country: The city, state and country your company is based in.
Then, hit "Run" under the "Generate Certificate Signing Request (CSR)" section.
Once the cert request is generated, copy the entire code block including "BEGIN CERTIFICATE REQUEST--- to ---END CERTIFICATE REQUEST---" and give that to whoever requests your certs from a Public CA.
When you get your cert generated and sent back to you in .pem format, import it into the SpamTitan under the "Import Certificates" section.
Under "Import Certificate from PEM" click "Choose File". Select your cert.pem file, and click "Import":
You can view your imported cert under "Installed Signed Certificates" by clicking the magnifying glass icon:
You'll then be presented with the cert details to make sure it's correct:
SpamTitan TLS Settings
Now that we have the cert in place and SSL enabled, we need to enable and configure TLS on the SpamTitan.
Navigate to Settings > TLS and click "Enable" for TLS. Select your new public cert, and enable logging:
**Note** This will also enable TLS for receiving and assign that cert for outside senders who need to verify your mail system (some banks require certs on both sending and receiving ends).
Next, navigate to System Setup > Mail Relay > Outbound.
Under "Trusted Networks" we'll add our Exchange external IP address(es). In my case it's my Edge server, but this could also be your internet-facing Mailbox Server(s):
Under "TLS Encryption" we'll enable TLS, and in the drop-down choose "Use TLS for specified domains and Opportunistic TLS for all other connections". We do this because we don't want to force TLS on hosts that don't support it, which will drop connections:
Next, we'll add our recipient domains (these will match the domains we added in our Exchange Send Connector) with the following settings:
Domain: the top-level domain name
Include sub-domains: Yes
Policy: Mandatory TLS Encryption (aka Forced)
Allowed SSL/TLS Protocols: TLSv1/TLSv1.2 (these are most commonly supported)
Comment: Optional
The domain will now be listed:
Under "Send Client Certificate" choose "enable" and verify that your public cert is selected and click "Save":
Now, send a message to your gmail address (if you have one) or send a message to your external domain contact and verify that TLS was enforced by checking the receiving email header. You'll see the TLS version used to send the message:
All done! Now you'll be sending secure messages!


i have read through almost all your posts :-) they are very helpful.
ReplyDeletejust one word for totemo: we are using it since 2014 (the first version ever), it works very well. You are true about java. It causes problem after every update.